


1 Pattern= COAT • VEST • SHIRT
The process of working with one pattern creates challenges I enjoy. Smart sewing means doing more with everything... so let's start the New Year expanding your creativity and strengthening your sewing/designing skills!
Here is how this experience is playing out in my MAKING this winter.

3 garments from the CACICEDO Pattern-
Thank you Jean Cacicedo for sharing your awsome design with us! I’ve just used it to create a new coat, vest & a shirt. In general, the shirt is the smallest garment, the vest a bit larger and the coat the largest ( think inner to outer layers). I am working with the large (coat) and medium ( vest/shirt) sizes. Starting to design shirts from the Cacicedo Coat Pattern, I created Design Experience 2.0 , a guide for ideas and design changes to adjust the Cacicedo for a more fitted shirt.

COLLABORATING-
The COAT- is Cashmere with hand-knit elements and stitching in wools, silks and mixed fiber yarns. The Coat was a delightful collaborative project with my friend, Dona Zimmerman (who created Websters, the awsome yarn & art to wear store in Ashland, Oregon). So many beautiful things in a collaboration….from design thinking to sharing technical making aspects. I’m not a knitter and learning so much working with Dona.

VIDEO -Think about creating this stimulating process with another maker in your life. See my video with Dona about the coat / link.

THE VEST- is melton wool with hand-dyed silk noile, kantha and other textured pieces used as collage elements and binding. THE SHIRT-is a cotton blend commercial print with a pin-stripe suiting on the sides, sleeves and collar facing. The pin stripe fabric was re-purposed from a pair mens pants.
Here are some of the Details-

COLLARS: So many ways to shape, rearrange, add texture and interest to a collar. You may have your own ideas about this already! The collar on the coat was used as is in the pattern: a full shawl collar. It’s cozy as a wrap that can stand or foldback and roll and soften the look down the front. It is part of the main pattern piece and easy to construct.

The shirt collar was shortened by 3” at the back, and tapered down the front, like on the vest trimmed collar shown below. Not sure how much collar I wanted or how it would lay, I cut it from the coat pattern and decided how much to trim once I saw it on the dressform. A facing was cut to fit the collar shape from the suiting for contrast. Tucks and gathering at the outside edge of the collar would add some nice shaping too. Love the resulting scrunched shaped of the shirt collar!

On the vest, the collar was shortened by trimming as indicated above. The new 2" standing collar is one layer and finished with binding around the edge continuing down the front.
Silhouettes, Pockets, Side Shapes:

The COAT has an added yoke across the top of the back, left open for dimension and movement. An extra piece was added under the arms then the sleeves were added, leaving the underarms open repeated that movement and silhouette interest. The armholes were bound with silk bias to finish. The larger knit pieces on the front of the coat, were attached then left open on some of the edges for movement as well. The coat was cut open down the side front to add inseam pockets on both sides (in the pattern). Not wanting to stitch the outline of pocket shapes on the front of the coat, accent hand-stitching with the yarns were used to close the pocket and some invisible handstitching (that disappears in the thickness of the cashmere) to stitch the rest of the pockets edges closed on the inside.
 With the coat open down the sides, the addition of a large tuck on the bottom on each side adds a nice angled shape to the edge of the coat and drops the center front.

After cutting out the vest piece and sewing the shoulders together, The VEST was cut (from the back edge of the armhole) down to the bottom ending 3” from the hem. When the side dropped it revealed the perfect place for a collaged pocket!


The dropped shape became a diagonal flap as it folded over. The back pocket panel was collaged with complimentary fabrics, lined and topstitched in place behind the diagonal opening. Here's my favorite finishing technique for shaping a pocket in wool: To emphasis the shape of the pocket, use a damp washcloth, heat it (with hot water or the microwave), then fold it into the shape of the pocket and place it inside, tight into the corners. Let it sit until cool at least afew hours. Once the cloth is removed and the pocket is dry….it retains the dimensional curved shape of the pocket. The added collage shapes were hand stitched in several places around the vest. The vest hem was cut with pinking shears.


The SHIRT side panels, cut separately and on a slight bias, are a soft 'A' shape. The sleeves, left open under the arms, continue the pin stripe suiting down the sides to finish with print fabric cuffs.The mens suiting on the side panels gives the silhouette a soft fullness relating to the scrunchy collar. The added width was tucked towards the bottom of the front and back edges on the sides. Working my way down the sides, any extra length isn't cut off until the hem. Consider the weight and hand of a garment when deciding on the amount of hem it needs. This shirt has a 2” hem, which adds weight for a nice hang. The inseam pockets were kept in the shirt version too. Often the decision to hide a pocket (inseam) or make it part of the garment surface, is part of the overall design. Think about how the eye will move and what can be highlighted about the garment. A bold pocket statement Is sometimes the perfect anchor for a design…like on the vest version.

Front Edge Finishings-

COAT & VEST: The binding, on front edges of the vest and coat, are on the bias and ENCLOSE the raw edge: Machine sewing in place then steamed, wrapped around the raw edge and hand stitched for an invisible finish. Another option would be to stitch the binding on the edge and steam the coat and binding edges back. This leaves a larger ‘facing piece’ on the inside, and just a small edge of the bias (looking more like piping) on the edge. It is a lighter weight look and also works well. SO many options in our tool kits! The more technical things we know...the more we can use them in creative ways. Although I considered a collection of buttons, a beautiful shawl pin closure was the right thing. I love the combo and patina on the metal with the fabric and yarns. The addition of the poka dot silk scarf is a beautiful, soft finish.

VEST: Making the binding out of the scraps was first, even with smaller pieces you mostly want bias…although where the lines are straight (down the front) various grain directions can work. Prepping the armhole-If you are busty, this process will make a big difference. Whether you are adding a sleeve or a binding, it is part of a successful armhole. EASE Stitching: To keep the armhole from gapping, especially along the bust edge, sew a running stitch, along the garment seamline, then pulling the thread to draw the fabric in and steam the fabric to hold the ‘cupped’ shape where needed. This can replace the need for a dart. Try on to confirm shape. Next apply the bias: With some tension on the bias strips, pull and stitch the bias in place. Steam the bias binding in place then wrap around the edges of the wool and hand stitched (or stitch in the ditch) to finish. The bias should be slightly ‘tighter’ than the surface you are sewing it too for as professional finish. Collage shapes were hand-stitched in various places around the vest for design balance and interest to the front edge.
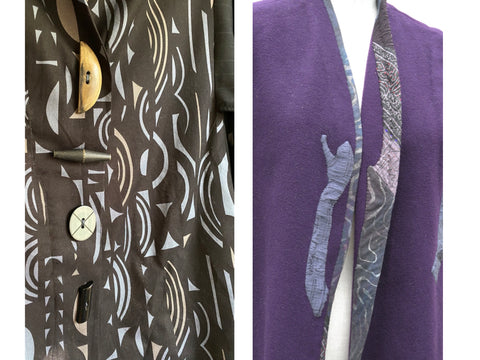
The button collection on the SHIRT was inspired by the shapes in the fabric design. Instead of making buttonholes to fit the odd shapes in the button collection, this front shirt fronts were overlapped and the buttons sewn on through both layers making the shirt a pullover. Creating multiple garments with the same pattern is one of the best ways to grow our work. Jean's Coat Pattern is one I will continue to enjoy working with in the future.
A shout out to all the enthusiastic & talented INDIE pattern designers- Thank you for share your creativity & love of sewing with our growing community!
Enjoy the MAKE.
.....And sew on, Diane
3 comments
Great collaboration Diane. Lots of great ideas here.
Loving the collaboration story with Diane, Jean and Donna making this a truly unique coat.
Beautiful garments. Your blog comes at just the right time for me. I have been putting off my coat project for too long. Time to get serious!